|
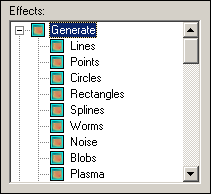
Effects Window |

The set of various effects which is subdivided into the following groups:
ò Generate ò
The basic group. It's intended for generation of graphical primitives, i.e. all effects of this group are the basis of our future image. The more commands you will use the more complex will be image.
Read also description about Additional Controls
ò Lines , Points , Circles , Rectangles , Splines , Worms , Pattern
ò Variant
ò
Sets variant of the chosen effect.
ò Red, Green, Blue
ò
Mask of red, green or blue color. In
mode of the "Fixed Colors" you directly may
choose color from all true color palette otherwise all colors are chopped off on
this mask.
ò
Step
ò
Sets step between points of a graphic
primitive.
ò
Thickness
ò
Sets thickness in pixels.
ò Hardness ò
Sets hardness of edge of a graphic primitive. Hardness works only when thickness is not equals 1.
ò Lines
ò
Lock
ò
Sets one angle (Angle parameter) for all lines, otherwise random.
ò Circles , Rectangles
ò Filled ò
Fills all generated circles or rectangles.
ò Image File
Adds an image file. In total there are two modes: resize and cut.
ò Resize (resize checkbox on) ò
Resizes the file's image concerning the size of the current image.
ò Cut (resize checkbox off) ò
Cuts only part of image file without resizing. You may move the image in the image preview window.
ò Freehand Layer
It is the simple built-in graphics editor.
ò Zoom options ò
![]()
Absolutely identically to functions of "Image view area zoombar".
ò Toolbar ò
![]()
Move, Pencil, Eraser, Line, Ellipse, Filled Ellipse, Rectangle, Filled Rectangle, Text, Flood Fill, Dropper are main tools of freehand layer. Just move the cursor where you want to draw the figure or put some text, then push left mouse button, then move on some distance and push out the button. The left mouse button choose foreground color, the right, background color. Colors substitute each other when selected "Eraser" mode. If you want proportional objects just hold "Shift" key when moving.
ò Brush Size, Hardness and Step edit boxes ò
![]()
Brush size interval from 1 to 64 (the more number the more size). Brush hardness interval from 1 to 100 (the more number the more hardness of brush). Influences the Pencil, the Eraser, the Line, the Ellipse and the Rectangle.
ò
Undo/Redo Toolbar
ò
![]()
Total 10 buffers, Image Styles saves content of the buffers on the
your hard disk. You may use Ctrl+Z (Undo) and Ctrl+Y (Redo) keys for fast
calling of these functions.
ò
Show Grid
ò
![]()
The grid is a series of intersecting lines that are superimposed on an image to help you align and position objects accurately. You can display or hide the grid at any time by this button. You may modify distance between lines in "Options" dialog.
ò
Snap to Grid
ò
![]()
The Snap to Grid function automatically places objects along the grid. When you release an object, Image Styles moves it until the edges are aligned with the nearest grid lines.
ò
Other controls
ò
Read description about
Additional Controls.
ò Deform ò
Effects for distortion and deformation of an image.
ò Twirl, Pinch
ò Lock angle (height) ò
If the flag is checked off then program selects a random angle for effect otherwise it is defined by "Angle" parameter.
ò Sine distortion, Distortion by Buffer, Waves
ò
Wrap
ò
Works only in the Standart (not seamless) mode. In
the wrap mode all edge points occur from the opposite side otherwise the
last edge pixels are copied only.
ò Kaleidoscope
The effect is similar to what one sees when looking through a kaleidoscope. Just two combo box modes: 8 and 12 faces of polygons. In 12 faces mode for proportional resolution of the effect use formula:
y=x*(2/3), i.e. if x=256 pixels, then y=256*(2/3)=170 pixels.
ò
Distortion by Buffer
Simply put something in the buffer and then add this command. For creation
of
more beautiful images the map in the buffer should be with smooth colors
(like
a plasma).
ò Voxel
ò Use buffer as Map
ò
This checkbox allows to use the buffer as a map of
heights.
ò Special FX ò
The special group with standart (not seamless) effects.
ò Seamless
Smooths edges of the image. It is very
useful when you want to get the seamless image from an usual picture.
ò Border
Adding borders places a colored frame around an image.
ò Tilt
A deformation that tilts an image along its
horizontal or vertical axis.
ò Filters ò
These commands are intended for giving some design to an image.
ò
Blur, Motion
Blur
ò
Filter that smooth transitions and decrease contrast by
averaging the pixels next to hard edges. You can apply the Blur filter to an
image to reduce its grainness.
Motion blur is blur filter in the defined direction [Angle
parameter] and with defined length.
ò Gaussian Blur ò
Filter that blends a specific number of pixels incrementally (Radius value), following a bell-shaped curve. The blurring is dense in the center and feathers at the edges. "Poor quality" checkbox is intended for choice of quality of "Gaussian Blur". If checked then much better speed but low quality otherwise low speed but high quality. "Roughness" scrollbar allows to change quality of "Gaussian Blur" precisely.
ò Edge
ò
Filter that accentuate the areas of
contrast and edges in an image.
ò
Emboss
ò
Embossing the image in the view area by the
image putted in the buffer [Use Buffer as Map]
or concerning itself.
ò
Bump
ò
The light version of [Emboss]
filter.
ò Unsharp Mask
ò
Filter that produce the opposite effect of the "Blur" by increasing the contrast
between adjacent pixels where there are significant color contrasts, usually at
the edges of objects. With it, you can vary the thickness of the edges and the
intensity of the contrast.
ò Maximum, Minimum, Median ò
Filters are selected maximum, minimum or
median values between adjacent pixels of an image.
ò Buffer ò
The analogue of well-known "clipboard". Here you can put [Move to Buffer] the certain staff of an image during generation, then connecting that [Connect Buffer] with subsequent.
ò Exchange Buffer ò
Exchanges contents of selected buffer and image view area.
ò Add to
Buffer ò
Adds contents of image view area to the selected buffer.
ò Clear image ò
Clears the current image. It is very useful when you have placed something
in the buffer and then want to begin a new image.
ò Adust colors ò
Adjustment of colors of an image. Do you want yellow, green or maybe grayscale color applicable to your image??? Using these commands you can make it without any problems.
ò Gamma correction
ò
The gamma of an image is a measure of its contrast and
brightness. By correcting the gamma, you can adjust these two elements in
unison. Because this command can leave an image looking somewhat flat, you may
want to increase the contrast after you have corrected the gamma.
ò Brightness
ò
Lightens or darkens an image.
ò Threshold
ò
Effect to create a black-and-white image.
Very useful when you want to do mask for an image.
ò Inversion
ò
Inverts an image (makes the opposite colors). Sometimes you
may get the great results.
ò Contrast
ò
Changes the amount of shading between areas.
ò
Colorize
ò
Effect for obtaining an image in the defined gradation of color.
ò Shifter
ò
Effect for separately shift of Red, Green or Blue channel.
ò HSV
ò
Lets you adjust the hue, saturation, and
lightness of an image.